The Mid-Season Landscape Maintenance Walkthrough: 8 Things to Check Before July
A practical mid-season checklist for landscape maintenance crews. What to inspect, document, and address before summer heat exposes the gaps in your spring work.
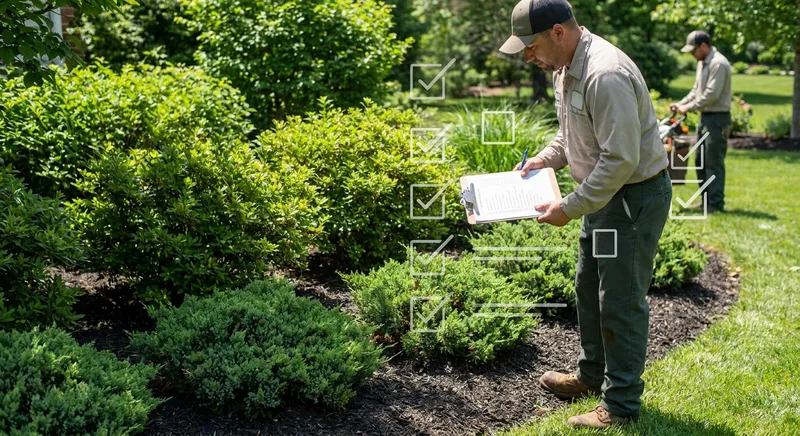
Table of Contents
By late May, your spring work has either set up the season or it hasn’t. Mulch is down, beds are cut, irrigation is running, and the lawns are looking the way they should. Or they’re not.
The gap between a good maintenance season and a problem season usually shows up in late June. By then, plants are stressed, weeds have escaped pre-emergent, and the customer has noticed. The crews who do mid-season walkthroughs in late May catch the problems while they’re still cheap to fix. The crews that don’t get to discover them in customer complaint calls four weeks later.
Here’s the checklist. Eight things to verify on every active property before the first heat wave hits.
Why mid-season walkthroughs matter
Most maintenance crews build their year around two big inspections: the spring start-up walk in March and the fall close-out walk in October. The five months in between are run by route — show up, mow, blow, leave.
The problem with that rhythm is that mid-season issues compound silently:
- A failing irrigation zone in May becomes a $400 patch of dead turf in July
- A bed that didn’t get pre-emergent in March looks fine in May and full of crabgrass by mid-June
- A shrub showing early scale insect damage in May has lost half its leaves by mid-summer
- Mulch settling and erosion that started in April becomes bare soil and washed paths by July
The mid-season walkthrough catches all of this when it’s still cheap. It also gives you a credible reason to upsell additional work — without it feeling like upselling.
When to do it
Late May to early June is the sweet spot in most of the country. You want:
- Full leaf-out on trees and shrubs (so you can spot damage and dieback)
- 4–6 weeks of growing conditions behind you (so spring failures have shown up)
- Before the first sustained heat wave (so you have time to fix things before they become emergencies)
For Southern climates, push it up to early-to-mid May. For Northern zones (5b and colder), late May to mid-June.
Block 2 hours per property on the schedule. For a 3-crew operation managing 80 properties, that’s roughly 2 weeks of dedicated walkthrough time spread across May and early June. Do them with the account manager and the crew lead together — neither one alone catches everything.
The 8-item checklist
1. Irrigation function on every zone
Stand at the controller. Run each zone for 2 minutes and walk the coverage. You’re looking for:
- Heads that aren’t popping up (broken risers, clogged nozzles)
- Misaligned spray patterns hitting walls, driveways, or the side of the house
- Dry spots between heads (head-to-head coverage failure)
- Wet spots that suggest a leak or stuck valve
- Zones that don’t activate (controller programming or electrical fault)
Catching irrigation issues now saves the $300–$800 emergency call when the customer sees brown patches in July. For an irrigation-focused walkthrough framework, see how to read a residential soil test report for what to do once you’ve found a problem zone.
2. Mulch depth and bed edge integrity
Walk every bed. Probe the mulch with a screwdriver or thin metal rod. You’re looking for:
- Mulch under 1.5“ deep (needs touch-up — bare soil is coming)
- Mulch over 4“ deep against tree trunks (“mulch volcanoes” — needs pulling back)
- Bed edges that have eroded into the lawn (needs re-edging)
- Bare soil patches where water erosion has moved material away from the bed
Most spring mulch jobs are 2.5“–3“ at installation. By late May, settling and decomposition have already taken half an inch off. Spots that started thin are now bare. Touch-up costs the customer $80–$150 per bed. Letting it go means weeds and aesthetic complaints by July.
3. Pre-emergent escape and existing weed pressure
Walk the lawn and beds with your eyes on the ground. You’re looking for:
- Crabgrass blades emerging in lawn areas (pre-emergent failed or wasn’t applied at the right timing)
- Nutsedge poking through mulch in beds (different chemistry needed — pre-emergent doesn’t touch it)
- Spurge, oxalis, and other warm-season annuals colonizing thin turf areas
- Bermuda grass or other warm-season grasses encroaching into cool-season beds
If pre-emergent failed, a post-emergent application now is dramatically cheaper than letting the weed bank build through July. This is also a credible upsell conversation: “We’re seeing some pre-emergent escape — recommend a post-emergent treatment this week to keep it from spreading.”
4. Tree and shrub health (5-second per plant scan)
You don’t need to be an arborist to catch problems. Walk past each significant tree and shrub. Look for:
- Branch dieback in the upper canopy (drought stress, root issue, or disease)
- Leaves that are smaller, yellower, or curled compared to others of the same species
- Sticky residue on leaves or sidewalks below (aphid or scale insect activity)
- Galls, swellings, or unusual growths on stems
- Bark damage from string trimmers, mower decks, or rodent feeding over winter
If you see anything that requires a real diagnosis, flag it for a follow-up visit by your arborist or plant health care specialist. Even if it’s something you can’t treat yourself, tree care preservation upsells start with someone noticing the problem early.
5. Lawn mowing height and quality consistency
Walk the turf areas and look at:
- Cut quality (clean, even, or ragged from dull blades?)
- Scalp marks at slope transitions or near hardscape edges
- Wheel ruts in soft or shaded areas
- Pet damage, irrigation overspray spots, or chemical burn streaks
- Areas that should have been edged but weren’t
Crew mowing quality drifts when no one is watching. A late-May walkthrough catches the drift before it becomes a pattern the customer notices.
6. Hardscape and drainage condition
Look at the patio, walkways, driveway edges, and downspout outlets:
- Settling or shifting pavers
- Cracked or heaved concrete from winter freeze
- Joint sand washed out of paver joints (needs polymeric sand top-up)
- Downspout extensions disconnected or buried
- Erosion at grade transitions or around foundation plantings
These aren’t usually your maintenance contract scope, but flagging them generates legitimate upsell conversations — especially if you also offer hardscaping services.
7. Customer-visible problem areas
Walk to the front door, the back patio door, and the spot where the customer parks. Look at the property from those three vantage points specifically. You’re checking:
- What does the customer actually see every day?
- Does the entryway look maintained or neglected?
- Is there a sight line from their primary outdoor living space that looks bad?
- Are there spots that don’t matter agronomically but matter visually?
Customers don’t grade your work on the back forty. They grade you on what they see from the kitchen window. Make sure those views are clean before they start noticing they aren’t.
8. Documentation: photos, notes, and recommendations
Every walkthrough finishes with:
- 6–10 photos per property (mixed: problems found, good condition documentation, recommended additional work)
- A written summary in the customer file noting what was checked, what was found, and what’s recommended
- A short email or text to the customer summarizing the findings (“We did our mid-season check today — everything looks healthy except a couple of irrigation zones we’ll fix this week. Photos attached.”)
This documentation does three things: it creates a paper trail if the customer ever questions service quality, it generates legitimate upsell conversations from a position of service rather than sales, and it makes the customer feel like you actually care about their property — which is the single biggest retention factor in maintenance contracts.
What to do with what you find
The walkthrough is only useful if it converts to action within a week. Build a simple priority system:
- Emergency (this week): Active irrigation leaks, falling tree limbs, anything that’s actively damaging property
- Priority (within 2 weeks): Pre-emergent escape, mulch top-up, dead plant replacement, hardscape safety issues
- Recommended (this season): Upsell opportunities — bed expansion, plant health care, drainage corrections, lighting work
- Notes for fall: Items to address during the October walkthrough — bulb planting, fall pre-emergent, dormant treatments
Send the customer a summary email with a clear “here’s what we recommend, here’s what it would cost, here’s our timeline.” About 35–50% of recommended work converts to add-on revenue when presented this way. The same recommendations made over the phone or in a passing crew conversation convert at maybe 10%.
The bigger picture
A mid-season walkthrough takes 2 hours of skilled labor per property. On an 80-property book, that’s roughly $4,000 in walkthrough labor cost (at $25/hour blended).
The return: 30–50% reduction in summer complaint calls, 25–35% increase in mid-season upsell revenue, and a measurable improvement in maintenance contract renewal rates. For a maintenance company doing $1.2M in annual contract revenue, the ROI on disciplined mid-season walkthroughs typically runs 8–15x.
It’s not glamorous work. It’s not the part of the business that gets posted on social media. But it’s the difference between a maintenance operation that compounds year over year and one that’s constantly putting out fires it could’ve caught in May.
Get the walkthroughs on the calendar before peak heat hits. Your July self will be glad you did.